Windows 11 is on the verge of taking down Windows 10 and previous versions of the Windows operating system. Most of us have already upgraded to Windows 11 and adopted the new environment, while the new modified operating system has many ups and downs. Other operating systems are getting upgrades, too, with pretty exciting features, such as the Chrome OS.
Chrome OS is one of the lightest operating systems; any system with 2GB RAM can handle it easily. The OS is Linux-based, meaning you can do almost anything with the Linux commands. However, Chrome OS is a bit different from other Linux distros as it is based on the operating system we commonly use on Android smartphones and other devices. In Chrome OS, you also get the support to install the Google Play Store which provides a wide range of apps and games for free.

Now you can install Chrome OS with Play Store and Windows 10 or 11 on the same hard drive and dual boot simultaneously. Installing both operating systems might take a lot of time and needs some specific software to be downloaded first. This article has written a detailed guide on dual boot Windows and Chrome OS with Play Store. So let’s get started.
Content Table
Install and Dual Boot Chrome OS and Windows 11
Before we begin, I would like to mention that this tutorial involves complex operations and a lengthy procedure. Go ahead only if you are good with operating multiple systems. Apart from that, this guide won’t touch any of your Windows files, but I highly recommend backing up all your crucial files because you never know when things go wrong.
Pre-requisites
- A USB flash drive with at least 16GB of storage space is necessary.
- UEFI Firmware support is another requirement for Brunch to work. It also works with legacy BIOS, but there are a few limitations. You can read them on the Brunch development page.
-
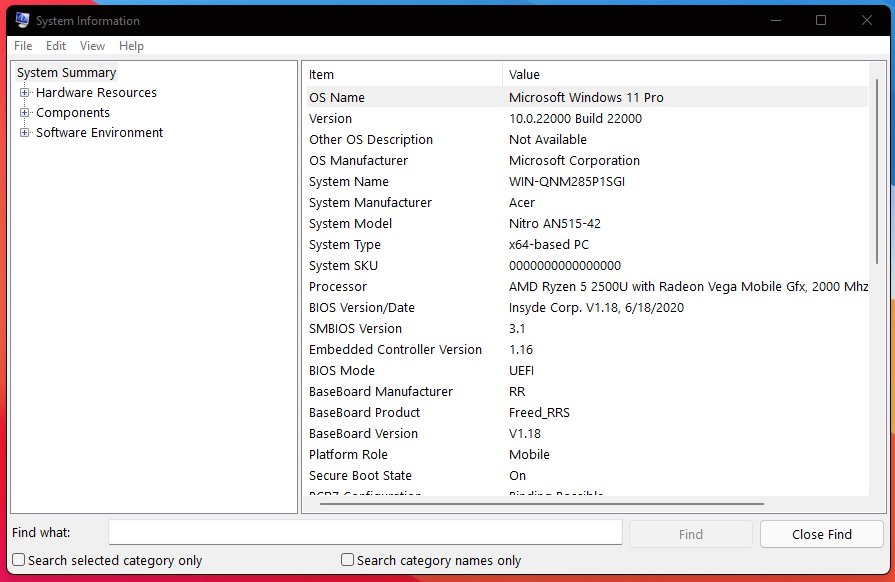
- To check whether your PC supports UEFI or MBR/BIOS, search System Information in the start menu and open it.
- Look for the BIOS mode. You’ll find your PC firmware type mentioned against it.

- Intel hardware (CPU and GPU) starting from 1st generation Nehalem architecture. Note that Intel first-generation graphics do not work with ChromeOS versions above r81.
- AMD Ryzen CPU and GPU. Currently supports AMD Ryzen and AMD Stoney Ridge processors only.
Downloads & Requirements
We need the following components for flashing Chrome OS on your Windows PC hard drive.
1. Linux Mint

We’ll use the Linux Mint Cinnamon image for dual-booting Chrome OS and Windows 10 or Windows 11 PC. You can use other Linux distros like Ubuntu or Debian too. However, I won’t recommend using them since many users reported facing various errors while installing and booting Chrome OS.
Download Linux MintCinnamon Edition
2. Rufus

Rufus is a Windows utility that helps create bootable USB flash drives. Here, the purpose of using Rufus is to flash the Linux Mint image on the USB storage.
3. Brunch Framework

The brunch framework aims to build a generic Chrome OS image from an official recovery image. It uses a 1GB ROOTC partition (containing initramfs, a custom kernel, the swtpm binaries, userspace patches, and config files) and a specific EFI partition to boot from it.
Warning: As Brunch is not the intended way for Chrome OS to work, at some point, some Chrome OS scripts could behave terribly with Brunch and delete data unexpectedly, including Windows / non-Chrome OS partitions. I highly recommend using Chrome OS on a device with less sensitive data.
4. Chrome OS Recovery Image
Now, it’s time to get the official Chrome OS recovery image. Click on the download button below. When the webpage opens, look for the word rammus. In the recovery column, hit on the latest recovery image to start the download. While writing this guide, the current version is 94, but it may change subsequently.
We chose Rammus because it works on most modern generations of Intel processors. However, I suggest you go through the below list and download the specific image based on your processor.
Download Chrome OS Recovery Image
Intel Processors
AMD Processors

5. Shell Script
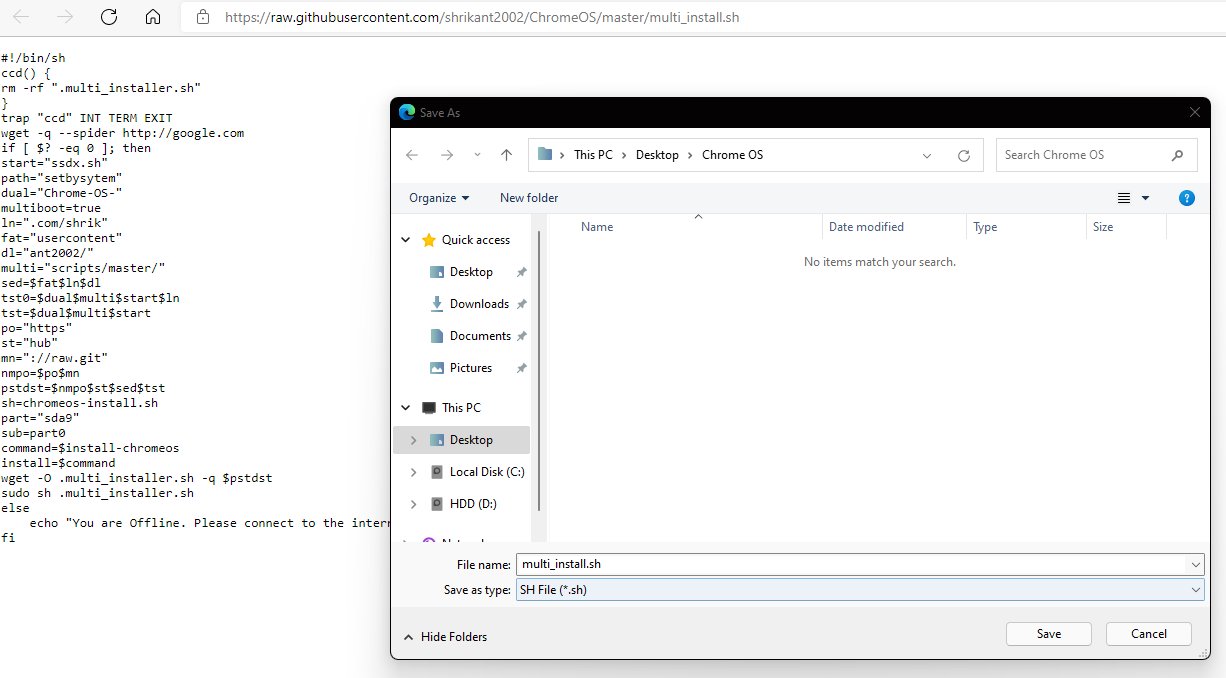
Finally, download the multi_install.sh shell script, which helps install Chrome OS on a Windows partition. Click on the download button below and press Ctrl + S to save the file.
Download multi_install.shMirror (Github)
Now that we have acquired all the necessary files, let’s go to the steps!
Organize Files in One Place
Step 1 – First off, gather all the downloaded files in one place. Let’s consider you have placed all the files in the Desktop folder.
Step 2 – Create a Chrome OS folder on the Windows Desktop. You can also create it in any other place having sufficient storage.
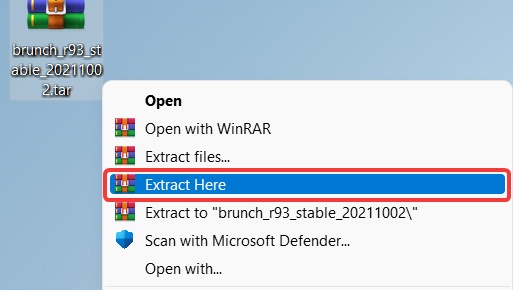
Step 3 – Using WinRAR, extract the Brunch package by selecting the ‘Extract Here’ option. As a result, you’ll get four files out of the archive. Now, move these four files to the Chrome OS folder.
- chromeos-install.sh
- efi_legacy.img
- efi_secure.img
- rootc.img

Step 4 – Next, extract the Chrome OS recovery image file.
Step 5 – Upon extraction, you’ll get a file with a .bin extension. Rename the .bin file to rammus_recovery. Now, move the rammus_recovery.bin file to the Chrome OS folder. Note that even if you have downloaded any other Chrome OS image like Volteer, grunt or Zork, make sure you rename it to their respective name + _recovery.bin. For example, the filename of volteer recovery would become volteer_recovery.bin, grunt recovery would become grunt_recovery.bin, and so on.
Step 6 – Move the shell script file multi_install.sh into the Chrome OS folder.
Step 7 – You should have six files in the Chrome OS folder. Do note the path of the Chrome OS folder as we’ll need it for performing further steps. 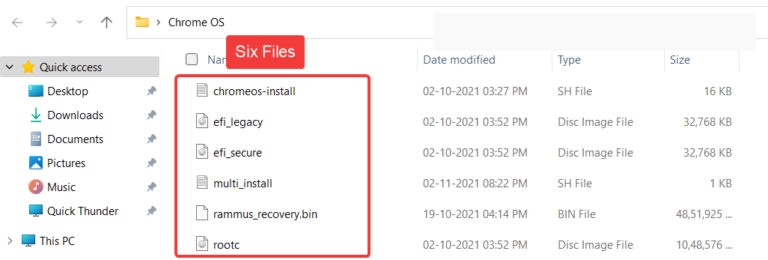
Flash Linux Mint Cinnamon
We’ll flash the Linux Mint ISO image on the USB storage using the Rufus utility. Linux distro installation is necessary because ChromeOS is a Linux-based operating system, and the shell scripts we downloaded require a Linux environment. The steps for installing Linux Mint on the USB storage are as follows.
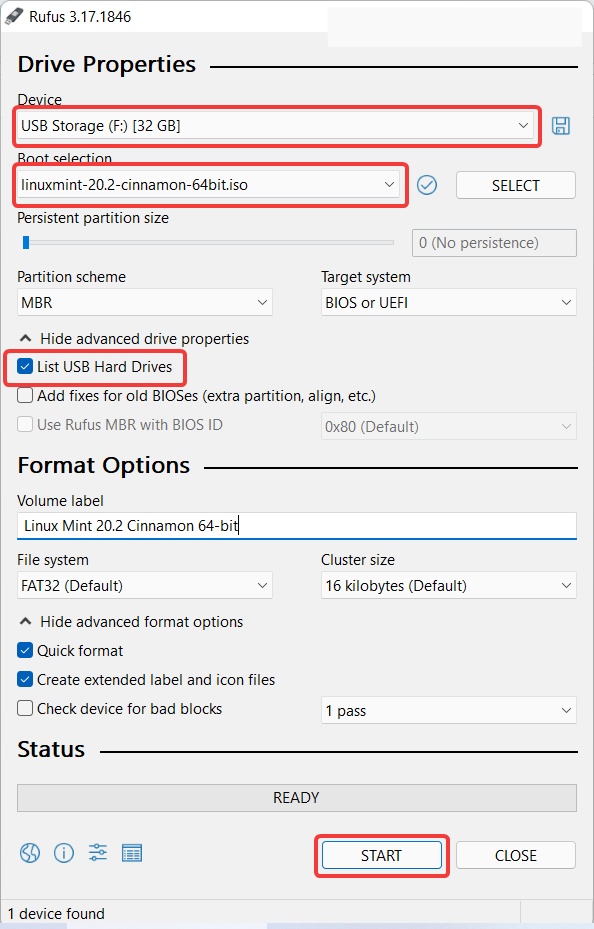
Step 1 – Plug in the USB storage device such as Pendrive or microSD card and open Rufus utility.
Step 2 – In Rufus, you shall see the plugged-in USB storage under Device. Here, I am using a 32GB Pendrive.
- Under Boot selection, select the Linux Mint ISO that we downloaded earlier.
- If you use a Hard drive, tick the List USB Hard Drives option to see your connected hard disk.
- Keep all other settings unchanged, and now press the Start button.
Do note that flashing the USB storage will wipe out all the data present on it. Therefore, we strongly recommend that you back up all the necessary data before pressing the Start button.
Step 3 – A popup will appear when you press the Start button. Select the Write in ISO image mode option and press OK. If you choose DD Image boot, the USB drive won’t allow you to operate in Windows. If you have a legacy BIOS and an old CPU, then DD Image mode is useful. 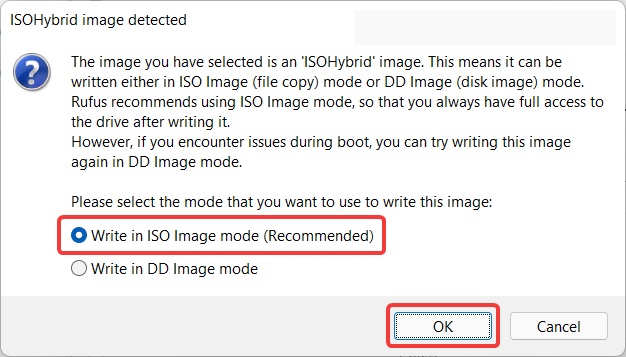
Step 4 – Rufus will warn you that it will erase all the data stored on the USB device we use to flash Linux Mint. If you have taken the backup, press OK. 
Create Unallocated Space for Chrome OS
We need to create an Unallocated partition using the Windows Disk Management tool. You need at least 14 GB or more free space on the hard drive to create an unallocated partition. I have given 100 GB of space, but you can choose your partition size.
On a side note, let me tell you something. Chrome OS requires partition size in multiples of 22 GB, for example, 22000 MB (22 GB), 44000 MB (44 GB), and so on. But here, you can assign any size you want. Later, before flashing Chrome OS using Linux Mint, we will provide an appropriate partition size.
Let’s shrink the existing drive and create unallocated space. Here are the steps.
Step 1 – Open Windows Explorer and right-click on This PC icon. Select Manage to open Computer Management tools.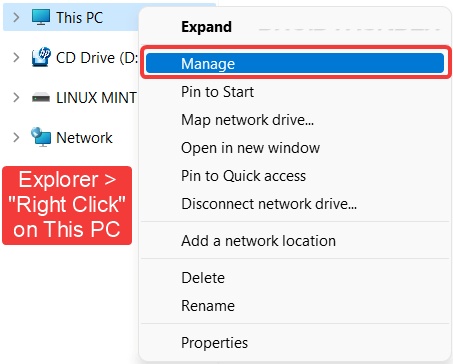
Step 2 – Select the Disk Management option from the left. Now, click on the partition from which you want to create unallocated space. I am using an external SSD for space creation. Right-click on the selected drive and click Shrink Volume. 
Step 3 – As discussed at the beginning of this section, I will create a 100 GB (100000 MB) partition. Press the Shrink button to proceed. 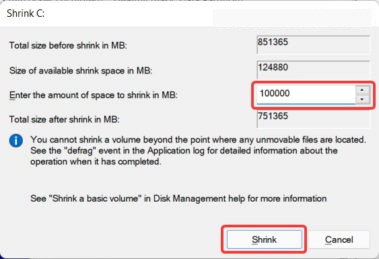
Step 4 – Now, in the disk management, you will see that the unallocated space is separated from the selected drive and marked in black. 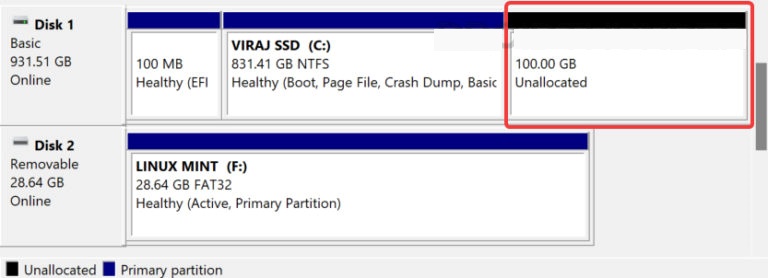
All good so far? Now, we have completed all the required operations on Windows OS. Let’s boot the Linux Mint Cinnamon image from the USB flash drive.
Boot Linux Mint from USB Storage
For Linux Mint bootup and Chrome OS installation, we will have to perform a few operations in the PC BIOS.
Step 1 – Shut down the Windows PC if running. Boot into the BIOS menu. To do that, start your PC and continuously press the F2 or DEL key on the keyboard. Your PC might have a different key set for booting into the BIOS. Refer to the below table and find out the right key.
| Brands | BIOS Key |
|---|---|
| Acer | F2 or DEL |
| ASUS | F2 for all PCs, F2 or DEL for motherboards |
| Dell | F2 or F12 |
| HP | ESC or F10 |
| Lenovo (Laptops) | F2 or Fn + F2 |
| Lenovo (Desktops) | F1 |
| Lenovo (Thinkpads) | Enter + F1 |
| MSI | DEL for motherboards and PCs |
| Origin PC | F2 |
| Samsung | F2 |
| Sony | F1, F2, or F3 |
| Toshiba | F2 |
BIOS Menu keys for various Brands
Step 2 – In the BIOS, navigate to the Boot tab and disable Fast Boot. Also, check if you have a CSM (Compatibility Support Module) option. If present, set it to Disabled because we are using a UFEI mode. You can keep the CSM option enabled if you want to use Legacy mode.
Step 3 – Now that we want to boot Linux Mint instead of Windows, we need to change the boot order. Move USB Storage at the top so that BIOS will boot our USB flash drive.
Step 4 – Navigate to the Security tab and look for Secure Boot Control or a similar option. If enabled, change it to Disabled. Without disabling the secure boot function, you can’t boot the Chrome OS even after a successful installation.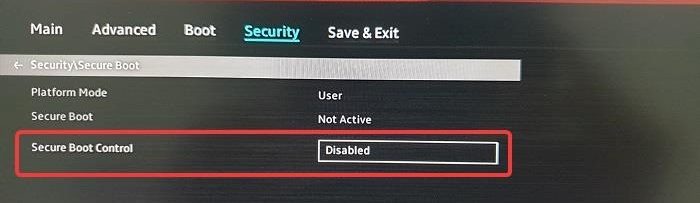
Step 5 – Press the F10 key to save the changes and exit the BIOS. Your PC shall restart, and you will see the following Linux Mint Menu. Press Enter to proceed. 
At this point, you should have entered into the Linux Mint Cinnamon OS.
Install Chrome OS
Step 1 – Once you see the Linux Mint interface, connect your PC to the Internet using an ethernet cable or Wi-Fi. The Chrome OS installer requires an active internet connection to fetch necessary libraries and dependencies.
Step 2 – Now, double-click the desktop computer icon and navigate to the drive where you have kept the Chrome OS folder. 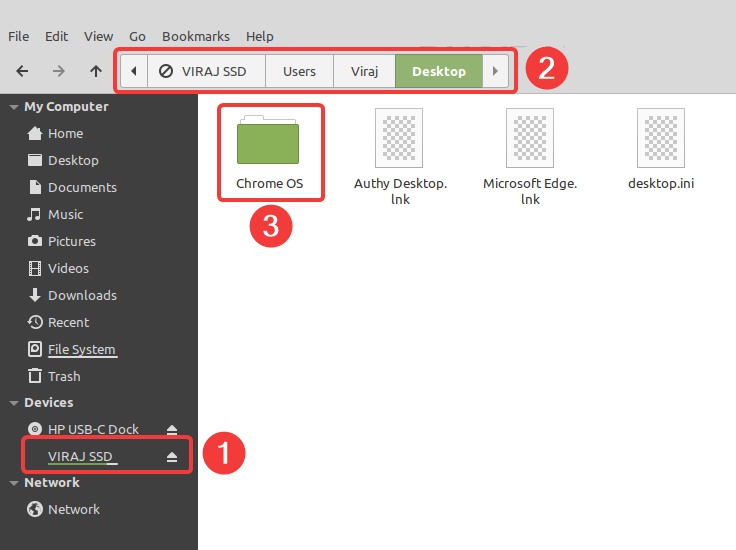
Step 3 – Right-click the blank white space and select the Open in Terminal option. A terminal window pointing to the Chrome OS folder shall open. 
Shell Commands
Step 4 – Enter the following command in the Terminal window.
sudo sh multi_install.sh 
Step 5 – The installer will ask you whether to download the required files and continue the installation. Press y and hit the Enter key.
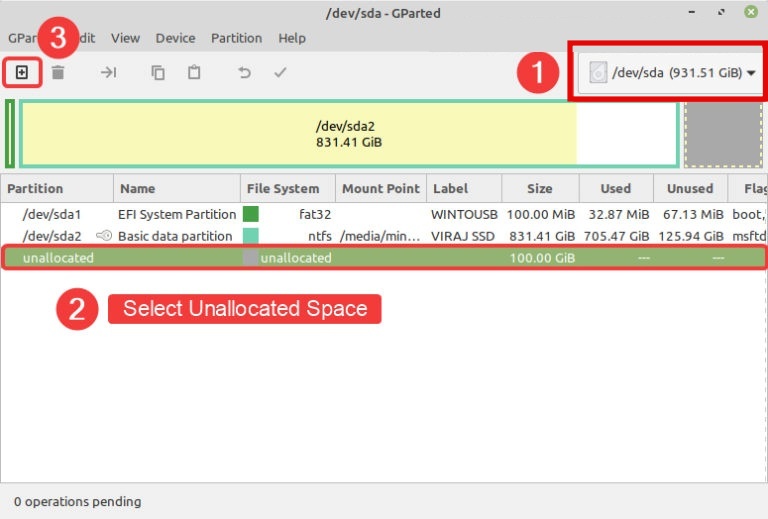
Step 6 – Following the installation, a window will appear, and it’s nothing but a Linux disk partition tool GParted.
- If multiple drives are connected to your PC, ensure the correct hard disk is visible at the top right side.
- Select the entry named unallocated.
- Click on the plus icon at the top left to create a partition.
Making NTFS Partition for Chrome OS
Step 7 – Enter 44000 (or any multiple of 22000) in the New size field. Enter Chrome OS in the partition name field and choose File system as NTFS. Press Add button.

Step 8 – Click the check icon at the top to start the partitioning process. It will take hardly a few seconds to complete.
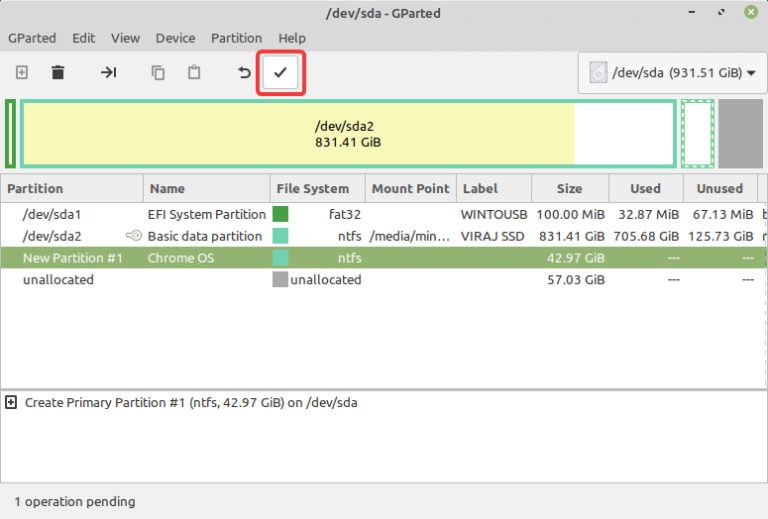
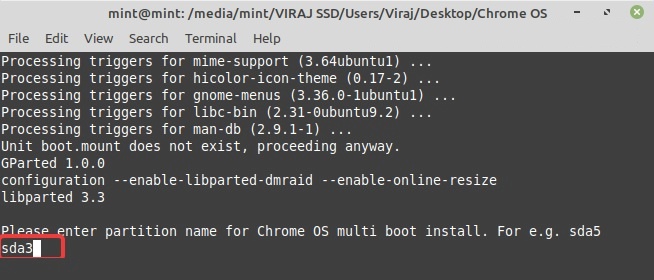
Step 9 – Note the partition name; we’ll need it in the next step. My partition here is sda3. Now, close the partition creation window so that the script in the terminal proceeds further.
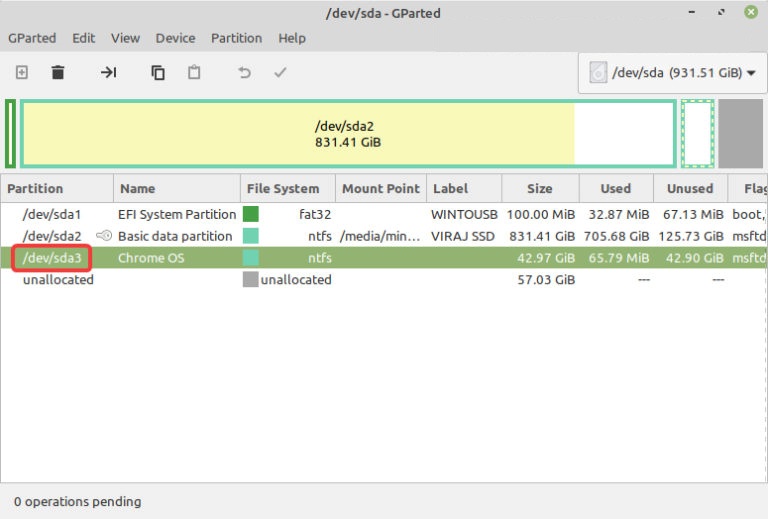
Step 10 – The installer script will ask for the partition name. Enter the one that you noted in the previous step.
Partition Writing Process and Errors
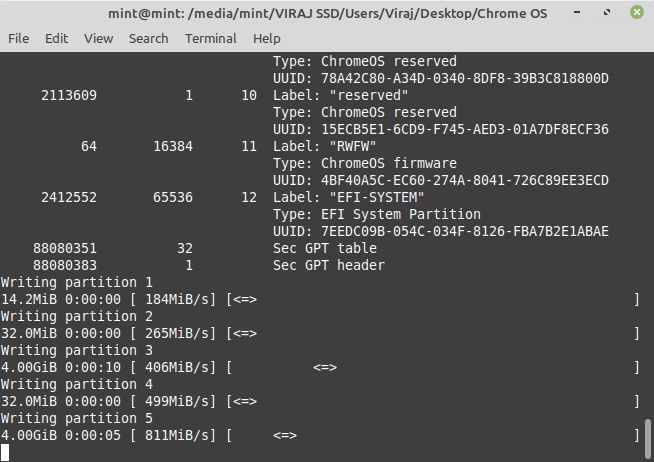
Step 11 – Check the size and name of the entered partition. It is a confirmation. If everything looks ok, then type yes and hit the enter key. The script will start creating various volumes; you should see the progress bar arrows as it writes.
Don’t panic if you get this error – grub-install: error: failed to get canonical path of ‘/cow’. Head over to the troubleshooting section of this guide and get it fixed.

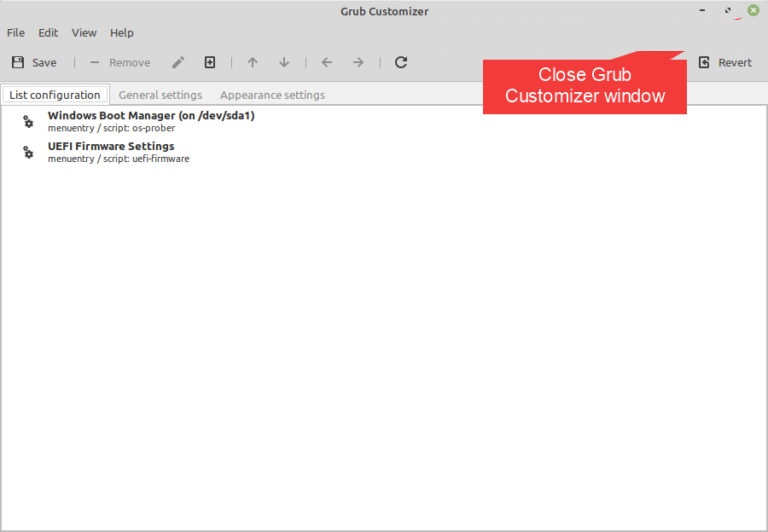
Step 12 – A grub customizer window will pop up once partition creation finishes. You don’t need to perform any actions here, so close the window.

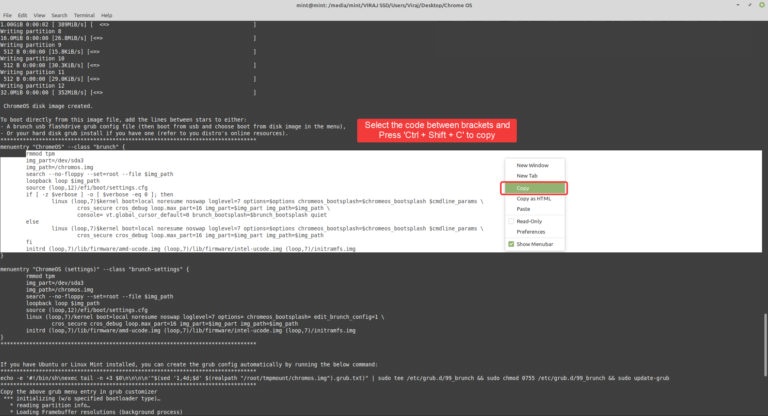
Step 13 – The final thing in the Linux Mint is to copy the brunch code, as shown in the image below. To do that, select the code using the cursor and press Ctrl + Shift + C key combination to copy it.
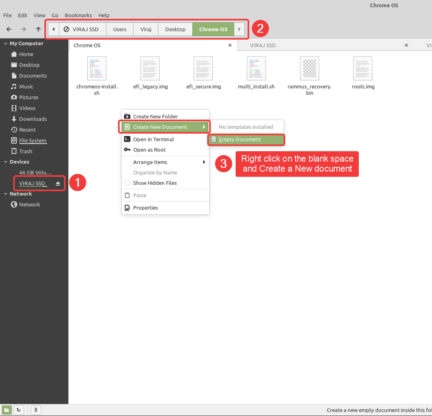
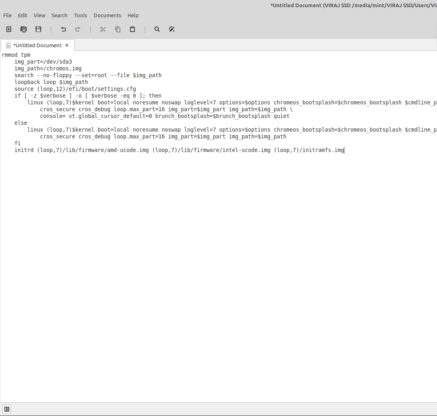
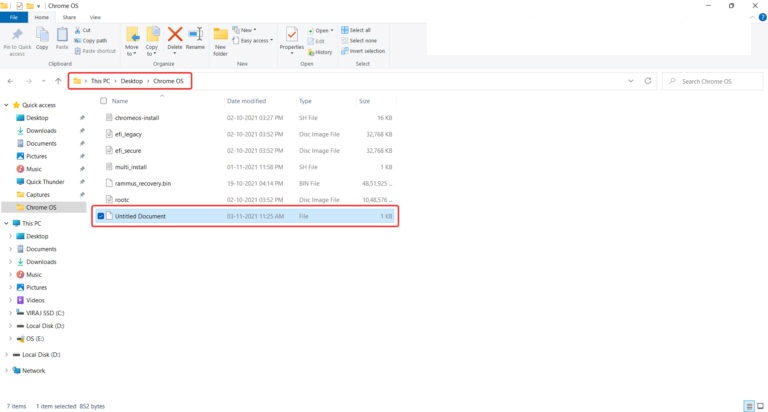
Step 14 – Navigate to the Chrome OS folder. Create a notepad file by right-clicking and selecting Empty Document. Paste the code that you copied in the previous step.
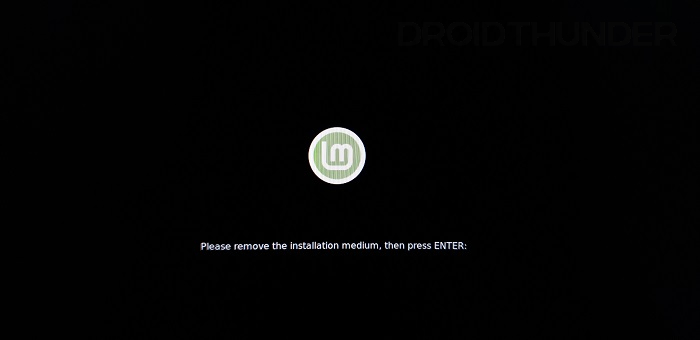
Step 15 – Finally, shut down Linux Mint, remove the USB, and hit the Enter key.
Must read 30 Best Chrome Extensions
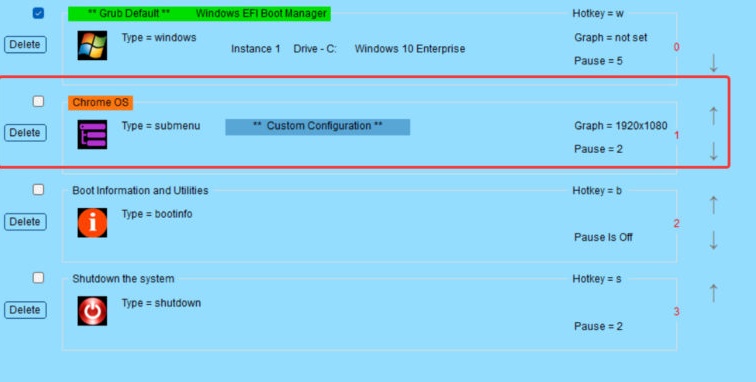
Dual Boot Windows with Chrome OS
You have successfully installed Chrome OS alongside Windows, but to run it, we need to add its boot entry to be bootable. We’ll use the Grub2win application for this job.
Step 1 – Download the Grub2Win Application.

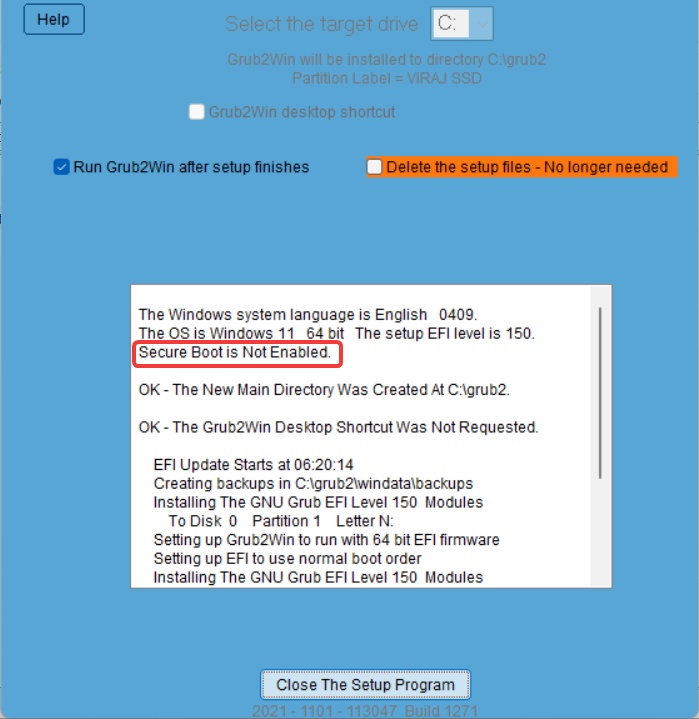
Step 2 – Open the Grub2Win application and ensure it says Secure Boot is Not Enabled.
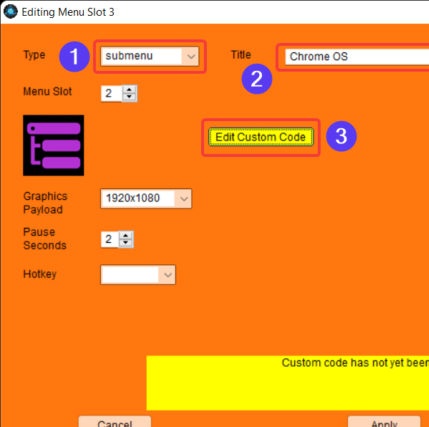
Step 3 – Now, click the Manage Boot Menu button and perform the following steps.
- Select Type as Submenu.
- Enter the Title as Chrome OS.
- Click on the Edit Custom Code button.

Step 4 – Go to the Chrome OS folder and open the text file we saved before shutting down Linux Mint OS.
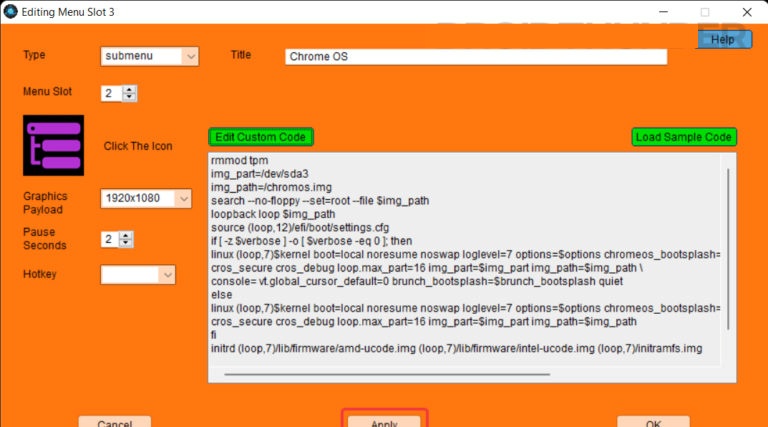
Step 5 – Paste the text in the “Custom Code” field as shown below. Click on Apply and close the window.
Step 6 – Move the Chrome OS position upwards, as selecting it at the startup will be easy. Close the Grub2win application and restart the system.
Must read Top 10 Download Manager Extensions for Chrome
Booting into the Chrome OS using Grub2Win Menu
1. When the system restarts, you’ll see the Grub2Win menu. Press down the key to select Chrome OS as a highlighted row.
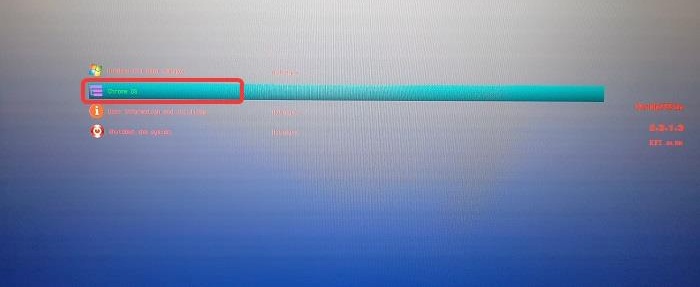
2. BIOS will execute the code we pasted while creating a Chrome OS boot entry in the Grub2Win application, and eventually, the Brunch framework will fire up.

3. Woohoooo! There you go, guys! You have successfully booted into the Chrome OS.
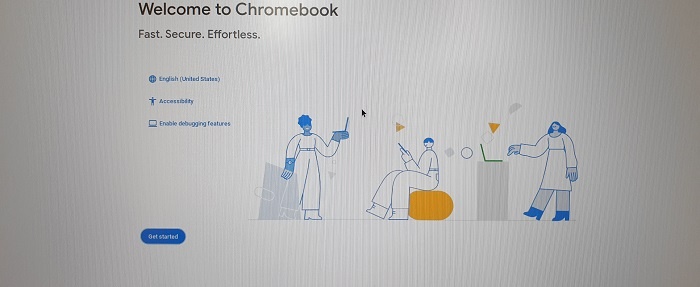
You can now set up your Google account and have fun using Chrome OS alongside your Windows 10 or Windows 11 PC. Move to the Troubleshoot section if any hardware device or WiFi is not working on the Chrome OS.
Remember that before you log into the Google account, you are officially not allowed to run Chrome OS with Play Store support on non-certified machines. In some ways or the other, you might be violating Google’s terms and conditions. So, we recommend you sign in with a secondary Google account to keep your primary account safe.
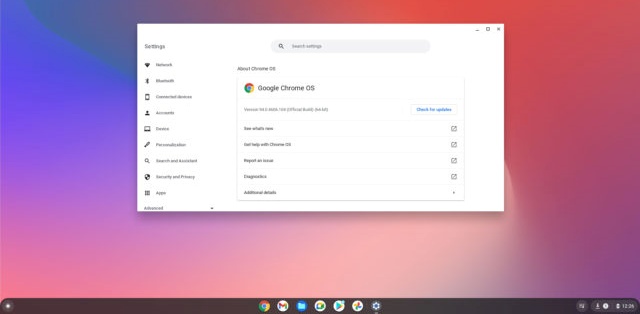
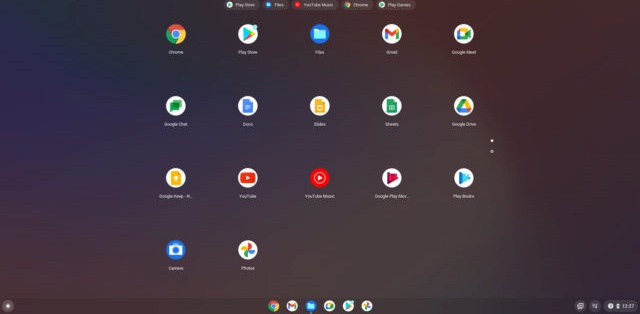
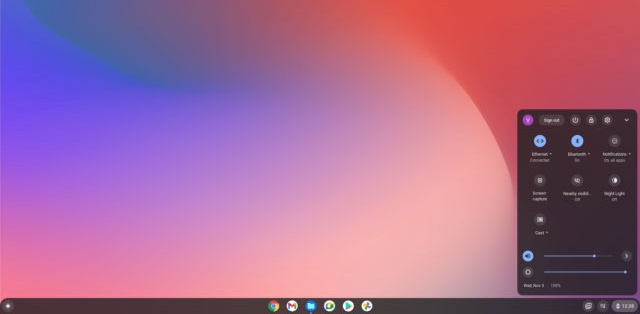
Chrome OS Screenshots
Uninstall Chrome OS From Windows PC
Installing Chrome OS on a Windows partition is one lengthy procedure. But when we talk about its uninstallation, it is simple. Just boot into Windows OS and open the Disk Management tool. Locate the Chrome OS partition we created at the beginning of this guide, right-click on it, and select format.
Similarly, open the Grub2Win application. Delete the Chrome OS entry we added and save the changes.
Must read How To Open Chrome In Incognito Mode Always
Troubleshooting (Updated December 2023)
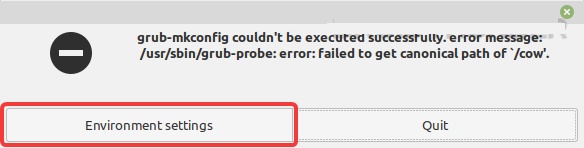
1. Fix grub-install: error: failed to get canonical path of ‘/cow’
So, you do come across this error, eh? That’s no problem. We’ll fix it by writing some quick commands in the terminal.
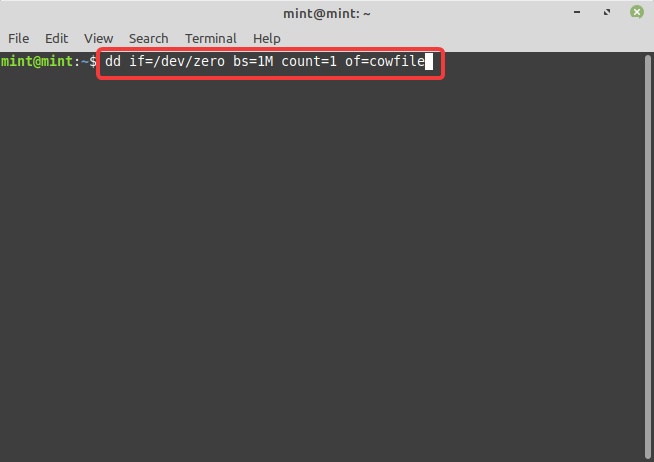
Step 1 – Since there is already one instance of the terminal running, keep it as it is. Open another Terminal window and enter the following commands one by one.
dd if=/dev/zero bs=1M count=1 of=cowfile
mkfs -t vfat cowfile
su mv cowfile /cow
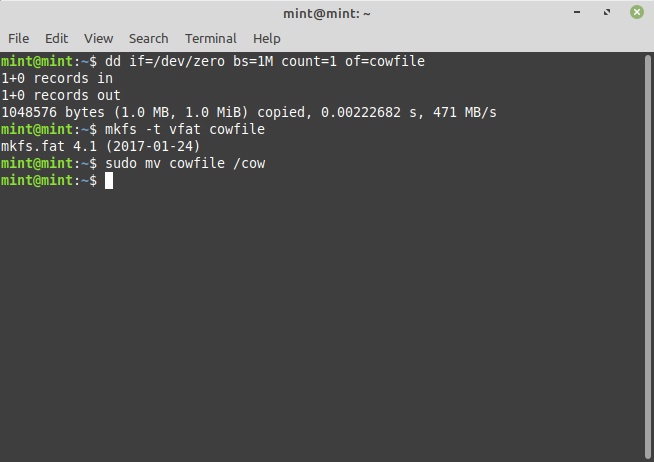
Step 2 – After finishing all the commands, close the second instance of the Terminal. Click the Environment settings button, and a dialogue with various options will appear. Click apply.
Step 3 – The Grub Customizer windows will appear upon applying the Environment settings. We don’t need to do anything here so, close it.
2. Fix Chrome OS Wifi, Bluetooth, Touchscreen Display not working
If you face issues with specific hardware components while using the Chrome OS, try Chrome’s Crosh terminal to make them work.
Fix the Chrome OS Bluetooth issue.
Step 1 – Press Ctrl + Alt + T to open the Crosh Terminal and enter the following commands individually.
shell
sudo edit-grub-config
Step 2 – Now, you can add support for your specific device hardware. You can find the complete set of commands from here. For instance, if you have an RT3289LE or RT3290 Bluetooth device, you can add “options=rtbth” (with quotes) at the end of cros_debug and before loop.max.
Step 3 – Now, press Ctrl + X, hit the Y key, and then press enter to save the file. Restart your PC, and this time, Bluetooth should work fine.
Fix the Chrome OS WiFi issue.
Step 1 – Find out the manufacturer of your WiFi card.
For Broadcom WiFi cards, use the following command in the Crosh terminal.
“options=broadcom_wl“
For Realtek WiFi cards, use the following command in the Crosh terminal.
“options=rtl8188eu” or “options=rtl8821ce“
Enjoy Chrome OS and Windows together on a Single Machine
Dual booting Windows and Chrome OS on your Chromebook offers the best of both worlds, combining the productivity of Windows with the simplicity of Chrome OS. With access to the Play Store, you can enjoy a wide range of Android applications, enhancing the versatility of your device. Follow the steps carefully, and you’ll seamlessly switch between operating systems in no time. That’s all from us in this guide. I hope you enjoyed it! If you face any issues while performing the above steps, post your comments below. We’ll try our best to help you out.
Frequently Asked Questions
1. Is Dual Booting Safe for Chromebooks?
- Dual booting is generally safe when done correctly and on compatible Chromebook models. However, it involves certain risks, and it’s essential to follow instructions carefully to avoid potential issues.
2. Can I Dual Boot Windows and Chrome OS on Any Chromebook?
- Not all Chromebooks support dual booting. Refer to the official developer documentation or community forums to check compatibility for your specific model.
3. Are Android Apps from the Play Store Fully Functional on Chrome OS?
- Most Android apps from the Play Store are fully functional on Chrome OS. However, some apps may not be optimized for the larger screen, leading to potential usability issues.
Finally installed both the OS in one go. Thanks a lot for such a nice article. I can finally explore Chrome OS on my laptop now. Thanks once again Technolaty and team.
Can I run on my i5 12400K processor with 16GB ram? Will there me any issue?
Yes you can. Good luck!
I am a IT student and it took me 3 hours to read and understand. Will try it now. Thanks for such a detailed guide Vishal.
Nice to meet you.
I read your article and tried to dual boot.
When booting chrome OS with Grub2Win Menu, I get “Error :no such mdule. please press any key”.
After that, when I press any key, the chrome OS starts, but I do not know the cause of this error.
Is there a problem with Custom Code?Any advice would be appreciated.
Hiii. I have Asus BR1100FKA, use Intel Celeron 4500.
I cant use rammus os stuck in patches are being applied, use voltree image same problem.
Any solution?