Motorola has launched the Motorola One Fusion Plus smartphone, a budget-friendly mobile phone that meets the minimum requirements for photography enthusiasts and mobile gamers. Now you can install TWRP and root Motorola One Fusion Plus using a computer and the TWRP recovery image and then use Magisk to get the root privileges.
Android smartphones are best considered for modding and use according to the owner’s wish, unlike Apple’s products, where the user is limited to the use of the device according to the company’s set of rules. Although this protects the devices from any security breach or from behaving abnormally, most manufacturers lock the bootloader and suggest users stick to the stock ROM they provide.
Modding an Android smartphone opens the door to exploring many new features, customizations, etc. In this article, we will learn how to install TWRP on Motorola One Fusion+ and root it using Magisk Manager. The section is divided into two simple parts for TWRP and ROOT separately, and you need to have an unlocked bootloader first and then install TWRP, which will let you flash the Magisk zip file for root access.
Content Table
About Motorola One Fusion+
The Motorola One Fusion Plus is a pocket-friendly and newly launched smartphone by Motorola. The device features excellent hardware specifications, and the operating system is optimized for general and advanced users. The key specifications of the smartphone are:
- 6.5-inch HD+ IPS display with a screen resolution of 1080 X 2340.
- Qualcomm Snapdragon 730G chipset.
- Adreno 618 GPU.
- Internal storage is 128GB and comes in one variant of 6GB RAM.
- Camera – In the front, there is a 16MP motorized camera, and at the back, there is a quad-camera setup of 64 MP + 8 MP + 5 MP + 2 MP.
- The device is powered by a massive, non-removable 5000 mAh Li-Po battery.
- Android 10 comes out of the box with Stock Android and no bloatware.
Install TWRP Recovery On Motorola One Fusion Plus
In this article, you will learn how to install TWRP on Motorola One Fusion+ in a detailed tutorial using two different methods on a computer. After you install the TWRP recovery on your device, you can flash custom ROMS, kernels, mods, etc.
What is TWRP Recovery?
Android smartphones are shipped with stock recoveries and stock ROMs by default. However, stock recovery is limited to updating the stock ROM and resetting the device in an emergency. TWRP is a custom recovery image that blends in with the smartphone and allows the device to boot up custom ROMs, flash custom kernels, install different mods, patches, Magisk/SuperSu images, etc. TWRP and other custom recoveries are the keys to modifying the Android system files.
Benefits of TWRP Recovery
- Install any custom ROM.
- Update to the latest version of Android OS.
- Root Motorola One Fusion Plus without PC
- Take Nandroid backup.
- Change file system from EXTFAT to F2Fs.
- Create/Change partitions.
Drawbacks of TWRP Recovery
- Device Warranty is void.
- OTA updates cannot be installed.
- It might brick the device if the wrong file is flashed.
- Few options in TWRP are sensitive and for advanced users only.
Method 1: Using Computer (100% Success Rate)
Step 1: Turn on USB Debugging and OEM Unlock.
- Go to Settings > About Phone > Tap on Build Number 7-8 times until you see the “Developers Options Enabled” message.
- After that, go to Settings > Advanced Settings > Developers Options > Enable “USB Debugging” and “OEM Unlock”.
Step 2: Download and Install the following on your computer.
Step 3: Download the TWRP for your device model. The codename for Motorola One Fusion Plus is Titan. Rename the file to recovery. img.
Step 4: Turn off your Motorola One Fusion Plus. Press the Volume Down + Power button until you see the Green Android Logo.
Step 5: Connect your smartphone to your computer using the USB data cable.
Step 6: Go to C: Program Files (x86)Minimal ADB and Fastboot and right-click on py_cmd.exe and run it as administrator
Step 7: Now type the following command in the Command Box:
The flashing process takes about 3-5 seconds, and you will get to see the following message on completion:
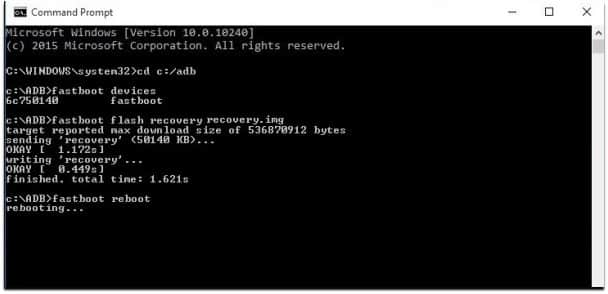
Step 8: Now type the following command to reboot your device to the system:
Congratulations! You have finally installed TWRP custom recovery on Motorola One Fusion Plus.
Method 2: Using TWRP App (50% Success Rate)
Step 1: Open the Play Store App, search for TWRP, and install it on your Motorola One Fusion Plus.
Step 2: Now open the TWRP App and grant “Root Access”.
Step 3: Next, tap TWRP Flash and search for your device model.
Step 4: Select the latest version of the TWRP image available and download it to your device’s internal storage.
Step 5: Open the TWRP app again and tap on TWRP Flash > Select a file to flash > Navigate to the downloaded folder where the TWRP image is saved > Tap Flash to Recovery.
Step 6: Wait for the process to complete. When the custom recovery flashing is done, you will get a message stating, “Flashing successfully”.
Congratulations! You have successfully installed TWRP without a computer on Motorola One Fusion Plus.
How To Root Motorola One Fusion Plus
You have enabled many hidden doors once you have installed a custom recovery on your smartphone. The next step is rooting Motorola One Fusion Plus without a PC. This is not mandatory, but you can explore your device more conveniently.

What Is Rooting?
Rooting an Android device, in layman’s terms, is granting the Superuser permissions to the phone system. Root access enables you to have complete control over your Android smartphone. Many applications such as Ad-blocker, Magisk, and Xposed require root access, and you may also learn more about the benefits and drawbacks of rooting an Android phone below.
Benefits of Rooting
Some of the advantages of rooting Motorola One Fusion Plus:
- Ability to install custom ROMS.
- Block advertisements system-wide.
- Overclock your device processor.
- Increase FPS while gaming.
- Change battery profiles.
Drawbacks of Rooting
Some of the disadvantages of rooting Motorola One Fusion Plus:
- The device warranty is lost.
- The root access is sensitive.
- Banking apps do not work.
- OTA updates do not work.
Instructions to Root Motorola One Fusion Plus
To root Motorola One Fusion+, a custom recovery such as TWRP or OrangeFox is necessary.
- Download the latest Magisk Manager zip file.
- Reboot to the custom recovery menu; we are taking TWRP as our custom recovery.
- Go to Install, select your download file, and swipe to Flash.
- That’s it. You have successfully rooted the Motorola One Fusion Plus.
Conclusion
You have learned how to install TWRP on Motorola One Fusion Plus without a PC and with the help of a PC with some commands. TWRP will help you flash custom ROMS, Kernels, Recoveries, and more. Also, you have understood the process of rooting your smartphone with the help of TWRP. Alternatively, you can quickly root Motorola One Fusion Plus without a PC and flash Magisk or Supersu.
Thanks <3
Me gusta como explican
Me encanta la aplicación
Oi
Thanks