Unlock the Redmi K20 Pro Bootloader officially and install a custom recovery like TWRP or Pitch Black. You can even root Redmi K20 Pro by flashing Magisk and the custom ROM.
Xiaomi’s Redmi lineup is primarily related to budget devices that offer excellent bang for the buck. Therefore, if you’re not fond of any company, you can decide according to your financial plan. PUBG Mobile fans will adore the optimizations provided by Redmi K20 Pro. Surprisingly, there isn’t any expandable storage, but you already possess the best hardware.
Xiaomi Redmi K20 Pro is among the best budget smartphones readily available. The red accent on the other side also increases the K20 Pro’s general appearance. You can hibernate any app you desire. The smartphone is made using impressive hardware and is retailed at economical rates.
It goes nowhere unless your phone falls on concrete or suffers damage. The phone also includes a heat dissipation system to stop it from overheating when you’re playing high-end games. The smartphone has an in-display fingerprint scanner, together with face unlock.
So basically, Unlocking the bootloader is extremely important nowadays. You must download the Mi open tool once you qualify to unlock the bootloader.
If you want to root your device, then unlocking the bootloader is the first step. After that, you may install TWRP recovery, root your device, and lodge a custom ROM.
Content Table
How To Unlock Redmi K20 Pro Bootloader
The procedure to unlock the Redmi K20 pro bootloader is straightforward; you will require authorization from MI, and after that, you will be able to install custom recovery on your device. Remember, unlocking bootloader voids the warranty of your device, so proceed at your own risk.
Pre-requisites:
- Laptop/computer (mandatory)
- Please register an account on the MI website and associate it with your device.
- Keep the device battery charged above 75%
- Take a backup of all the files and personal data from your smartphone, as the unlocking process deletes everything.
- USB Type C cable (provided in the box).
- ADB & Fastboot Tools.
- USB Drivers For Windows (not required on Windows 8.1 and above)
- Enable OEM Unlocking on your device
- Go to Settings > About Phone and tap MIUI Version 5-10 times until it shows Developer options enabled.
- Now go to Additional Settings under the Settings menu and open Developers options.
- Find the OEM unlocking option and slide it to enable. Alternatively, you might notice below that the MI Unlock Status shows “locked.”

Instructions
- Go to the MI Unlock website and log in with your MI credentials, the same as on your Redmi K20 Pro.
- Download the MI Unlock Tool and install it on your computer or laptop.
- Now, Turn off your mobile, press the Power button + Volume Down button together for 5-10 seconds, and release it. This will reboot to the fastboot screen.
- Connect your mobile to your laptop or computer and open the MI Unlock Tool.
- Log in with your MI Account and click the unlock button on the MI Unlock Tool Application.
- If this is your first time, a message will appear displaying “Wait for 360 hours,” which is 15 days to be precise.
- After 3 days, follow the same procedure from step 3, and then you will successfully get your Xiaomi Redmi K20 Pro bootloader unlocked.
How To Install TWRP On Redmi K20 Pro
Without unlocking the bootloader, flash recovery isn’t feasible. The rally also does not have any power after the Android is loaded. The TWRP recovery is a favorite recovery for a lot of users. The TWRP custom recovery has become the most popular and secondhand customized recovery around the Android world.
It is possible to use a custom-made recovery to create a Nandroid backup. You require a personalized recovery like TWRP. You can read more about how recovery works in our article about it. Customized rescues can make and restore device backups. In addition, personalized recovery is significantly helpful in creating a full smartphone backup.
Pre-Requisites
- Keep your K20 Pro charged above 75%
- ADB and Fastboot (follow the instructions and install it)
- USB Type C (provided in the box)
- Custom Recovery TWRP/OrangeFox/PitchBlack – download any one of them (make sure you extract the file if it is in zip format, and after extraction, you will get a .img extension file, which you need to rename as recovery. img)
Instructions
-
- Turn off your smartphone and press Volume Down Button + Power Button until you see the MI logo.
- Now connect your smartphone to the laptop or computer
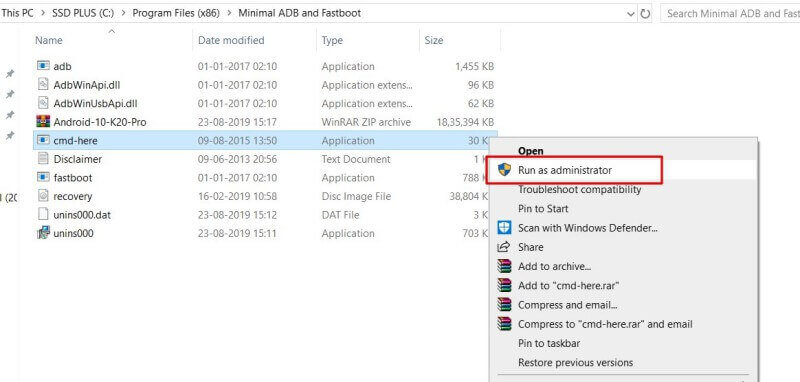
- Go to C: Program Files (x86)Minimal ADB and Fastboot and right-click on cmd-here and run as administrator

- Now type list devices (It will display your device on the ADB and fastboot tool window
- Type fastboot flash recovery recovery. img and hit enter. You will see the write successfully message.
- Now press and hold the Volume Up and Power button for 10-12 seconds until you see the Mi boot logo to enter the custom recovery mode.
How To Root Redmi K20 Pro
To root Redmi K20 Pro, you need Magisk and a custom recovery like TWRP or OrangeFox, which we installed earlier.
Magisk has been widespread in the last few years as more Android features are secured with Google’s SafetyNet system. Magisk is an alternate to the long-standing SuperSU called a systemless root system. Magisk allows you to execute many tasks to customize the program.
The newest version of Magisk is finally available after almost two months of waiting, and we’d like to inform you that it was worth it. The latest edition of Magisk Manager always makes it possible to install Magisk Beta on your mobile phone.
Instructions
- Download and copy the Magisk stable or beta version on your internal storage device (I recommend the stable version).
- Reboot to Custom Recovery (turn off your device and press the Power Button + Volume Up button together until you get a vibration).
- Tap the install button on the recovery interface
- Locate the downloaded Magisk zip file and slide to install
- Reboot the system and find the Magisk App (if it is not there, then install the Magisk Manager APK from the downloaded folder)
FAQs
Q1: Is unlocking the bootloader safe?
Locking the bootloader is generally safe, but it voids your warranty. Ensure you understand the implications before proceeding.
Q2: Can I relock the bootloader?
Yes, you can relock the bootloader, but the process is not straightforward. It’s recommended to assess the need for relocking before proceeding.
Q3: Will unlocking the bootloader improve performance?
Unlocking the bootloader allows customization, but it doesn’t guarantee improved performance. Custom ROMs and tweaks may impact performance differently.
Q4: Can I unlock the bootloader without a Mi account?
No, a Mi account is essential for unlocking the bootloader. Ensure you have one before starting the process.
Q5: Is data recovery possible after unlocking?
Once the bootloader is unlocked, data recovery becomes challenging. It’s crucial to back up your data before opening.
Conclusion
Unlocking the Redmi K20 Pro bootloader opens a world of possibilities, letting you tailor your device to your preferences. Remember to follow the steps meticulously, keeping in mind the impact on warranty and data. Embrace the freedom of customization and maximize your Redmi K20 Pro’s potential.